Wednesday, 30 January 2013

Preparation's what you need...


Last Monday was another brew day! As I've got a second fermenter now I decided I'd better fill it! So, time for my first re-brew... of sorts anyway.

I decided to re-brew my first beer but to make a couple of slight changes. I decided to use 60 ebc Crystal malt instead of 120 ebc. I also pushed the hop additions back by 15 minutes. I had a bottle of the first batch last night, and I still reckon it's good beer, but I would like to make it a little less heavy and wintral.

I also decided to mash 2C lower than the original in the hope of getting a slightly lighter body and a drier finish. Batch #1 finished fermenting at around 1.016 which was higher than I wanted. I'll be aiming for 1.010 with this batch.

On brew-day I had a bit of trouble hitting the mash temperature. Adding the grain dropped the temperature further than Beersmith had indicated, so I had to add more hot water to raise the temperature back up again. This also meant that I was adding less sparge water which led to the second runnings sticking a bit and pulling a few grains with it.

Still, that wasn't the main thing that went wrong! While the grain was mashing I was weighing out the hops and, despite the scales being a little erratic, I had everything set up and in bowls, ready to throw in. Then I happened to notice the IBU level was off the scale for an American IPA, over 100! This wasn't supposed to be the case! I realised that by pushing the hop additions back, I was increasing the the IBUs quite significantly. I also had weighed out the hops but not taken account of the alpha acid percentages. This is what comes of not preparing properly!

I rejigged the recipe in Beersmith to reduce the additions only to realise that each timed addition was a mixture of two hops, so I couldn't tell what I was taking out! In the end I swapped round two additions, split my late addition in half and threw the remainder in after the boil! Not exactly a scientific approach but, hey, I'm an artist!
I'm actually really looking forward to trying this brew, it smells lush and looks good too. I've got an airlock in the fermenter at the moment, but I know the Californian ale yeast can be a bit lively, so I might switch that for the blow-off tube tonight. I'll wait and see what state it's in when I get home!

Oh, and on the subject of hops, I found this little fella in my hops when I unpacked them! Always check your hops!

Sunday, 20 January 2013

The Belgian Tripel brew day

Yesterday was brew day for my effort at a belgian tripel. The recipe was lifted from Brewing Classic Styles - I thought this was probably a good place to start. I listened through the podcast for this recipe at work too, so I felt like I had a good handle on the process. The recipe I used is this:


Ingredients
Amount
Name
Type

%/IBU
6.35 kg
Pilsner (2 Row) Ger (4.0 EBC)
Grain
83.6 %
0.11 kg
Aromatic Malt (50.0 EBC)
Grain
1.5 %
67.00 g
Tettnang [3.70 %] - Boil 60.0 min
Hop

31.2 IBUs
14.00 g
Saaz [4.15 %] - Boil 10.0 min
Hop

1.5 IBUs


1.13 kg
Sugar, Table (Sucrose) (0.0 EBC)
Sugar


Yeast: Belgian Ale (White Labs WLP550)

Mash for 90 minutes at 65C.
Boil for 90 minutes.

Pitch yeast at 17C and allow to rise to 22C over three days. I will let the yeast go higher (as I have no means of cooling it down) but will ensure it doesn't drop below 22C.

Listening to the Jamil Show I picked up the tip to only add the sugar once the ferment starts to slow down. This is to encourage the yeast to break down the more complex sugars in the wort before being given all the simple sugars, resulting in better attenuation. This is important as the style should finish dry.

All in all the brew day went pretty well, but with the longer mash, and longer boil, it did stretch the day out more than usual. It also took a bit longer getting started as I was trying out a new spreadsheet for calculating water additions. To be honest, it's all a bit of a dark art really, and I've no idea what difference it actually made, but the pH and other things were all adjusted!

Mash, finally at the correct temperature.

Running the wort off (lautering doncha know!)  with the kettle above ready to sparge.

The mash temperature was a bit of a pig to hit. No idea why, but I was under, then over, then hit it. My mash tun isn't directly heated so it was just a case of adding more water to adjust the temperature. Thankfully I left some water out to start with so there was still room in the tun! 

Ever such a pale wort. That'll be the pilsner then!

A blockage free post-boil runoff 


One thing that always surprises me is the colour of the wort. I know it shouldn't because changing the colour is the whole point of the recipe, but I was still worried that the mash had gone wrong when the wort came out such a light colour.

One success of the day was in improving the post-boil runoff to the fermenter. My first two brews took ages as the hop filter kept clogging up with hot break/trub/whatever it's called. This led a a good 20 minutes of stirring to keep the filter clear. Not so today! Today I decided to skim off the hot break during the boil. From what I've read, there's no problem doing this as it's mostly left behind with the hops after the boil anyway. I wasn't exactly sure if it would help, but it certainly did. No blockages at all, just ran straight out - a process I'll definitely be repeating.

I didn't get my hot liquor tank built in time to use today, so I had to lauter into a fermenting bin and then transfer it to the boiler after.  Still, it all worked and now seems to be bubbling away contentedly in the corner of the kitchen. I just hope the temperature doesn't drop too much overnight. It's supposed to hit -7C tonight. Hopefully the water bath I have the fermenter sat in will keep it insulated. Time will tell!

The original gravity of the wort going into the fermenter was 1.058, which is pretty much where I wanted to be. As I won't be adding the sugar till later, the numbers are off from the recipe at this stage, but I should be on for a 10%abv beer if I can control the ferment ok in this weather.

Saturday, 19 January 2013

To b(ottle) or not to b(ottle)


Bottling beer is a process that I find many homebrewers tire of, and instead opt for cornie kegs and the like. I can totally see why. Obtaining, storing, cleaning, sterilising, filling and storing (again) 40 beer bottles for every brew you do is a time consuming business. But at the moment I have the time and being a new brewer I'm yet to get bored of the repetition involved, so I'm going to keep bottling for now. Also, bottling beer is pretty much free, whereas the investment needed in kegs and CO2 is just something I don't have. 

The other reason I like bottling beer is that it's just convenient to have bottles of beer! I can stick a couple in the fridge easily, I can take them to brew-club, I can give them to people, and I can store them in a few boxes and move them around if I need to.

So here's how I did it:
Take these...
...then do this...

...then use these...
...to give you these!

New brewery in Wales


Came across this blog today: http://hopcraftbrewing.blogspot.co.uk/

 Looks like these guys have been brewing beer for a while but are setting up a new brewery. Good stuff about the logistics of getting a brewery together. I'll be watching their progress with interest!

Bottles


So here we are, all ready for bottling the Porter. 


Gotta lotta bottle (sorry)

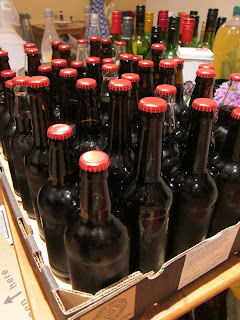
These are all bottles I've saved, had people collect for me, or scavenged from recycling bins! Recycling in action, right here ladies and gentlemen! Unfortunately, I haven't been able to get through quite the amount of bottles I needed since the last brew, so I actually had to buy 6 bottles from Wilko's on the walk home yesterday. I'd rather not do this. Apart from the cost of buying the bottles, it seems unnecessary when so many are thrown away and all that energy and resource goes to waste. By the time I get to bottling my next brew I aim to have fostered a handy bottle collection arrangement with some local pubs. If I'm upping my production rate I'm going to need them too.

My preference is for brown bottles. They keep the light out of the beer and help it to keep better. Clear bottles may look nice on a shelf, but they can lead to beer going 'skunky' in aroma. Now, obviously there are a few clear bottles in that picture, so I'm not going to say I never use them. If I'm using second hand bottles I can't be too picky! So the clear ones will be kept in a closed box to keep the light out, and I plan to drink these first, before light can cause any problems.

I've found re-using bottles to be pretty straight forward, especially where I'm saving them at home. I just rinse the bottles out when I've finished them, give them a quick spray inside with StarSan to sanitise them, then I stick them in the dishwasher upsidedown to drain and dry out. Where I inherit, or retrieve, bottles from other people I give them a proper wash with a bottle brush to dislodge any gunk/mould that might be living in there too. I know some people use the dishwasher to clean and sanitise their bottles, but I wouldn't be confident that the inside of the bottle would be properly cleaned, given the small neck opening. I also think that way uses far more energy - a bit of a waste and more expensive. 

The final step I take is to wrap the tops of the bottles in silver foil and bake them in the oven at 180 for 60 minutes. This is enough time to sterilise the bottles and kill off anything else hiding inside. I can then pack the bottles away with the foil still in place so that come bottling day I'm ready to roll!

Bottling time!


A quick check of the Porter at the weekend showed that the gravity was down to 1.010! This is actually a little lower than I was expecting and I didn't want it to lose all its body from fermenting out too dry. There was still the occasional bubble going through the air-lock but I've decided to treat it as finished. 

It tastes lovely, really smooth with liquorice flavours and a dry roasty bitterness at the end but without being harsh or overpowering. I hope that's partly a result of my decision to steep the dark grains rather than mash them, there's certainly no burnt toast flavour and that's what I wanted to avoid. So far, so good!

I racked the beer off the yeast and trub, and into the pressure barrel I use for bottling (it has a tap, which makes things easier). The weather gods are smiling on my brewing this time and we've just hit a cold snap, with temperatures hovering between 1C and 3C. Just right for cold crashing the beer to drop out the yeast and proteins - or so I've read! 

So I've wrapped a plastic bag over the barrel tap and stuck it outside to chill. My aim in doing this is to improve clarity in the beer, but also drop out a bit more yeast to avoid bottle bombs. This WLP001 yeast really does seem to just keep going and going if you give the fermenter a shake every now and then. I think this is something I could've done on batch #1 to get a better attenuation - note for next time.

Saison thoughts...


So, having bought ingredients for my next two brews and having another still bubbling away, clearly my thoughts turn to what I should brew next!

All of my brews thus far have been quite dark, rich, fairly heavyweight affairs. All beers that I like to drink or that I want to have a go at, but probably my choices have been influenced by the season. Comforting drinks for cold nights. 

They're also mostly drinks for people who are already fans of beer and my girlfriend is not one of these people! So I'd like to brew something that is a little lighter and more accessible. Something that she might enjoy too (I know, boyfriend of the year, right?!). So I'm thinking about brewing a saison next. I can't say I have a lot of knowledge about the style, and I've only tried a couple of examples - Dupont on draft, Bristol Beer Factory's saison, and a couple of efforts from homebrew buddies. I really like the fizzy sherbert flavour, which is different to other beer styles, so I think I'll give it a whirl.

So today at work I'll be listening to the saison discussion on the Brewing Network Sunday Show, to get a bit more of a handle on the style and what's involved in brewing one. Then I think I'd probably be best off buying a few different examples to try, all in the name of research of course! Then I can start looking for a good recipe. To be honest, I've got a good month before I'll have a chance to brew this, so there's plenty of time to plan...
I've also got an american amber ale recipe to try (from John Palmer's excellent How To Brew), so I'll need to fit that in somewhere too!

Scaling up, a bit


Today I'm having a delivery of brew-kit! That is, I have two orders turning up at my house today while I'm at work. Fingers crossed the drivers can find a kind neighbour to hold onto them for me till I get home. I hate having to arrange re-delivery or go to some trading estate to pick it up.

I've ordered two new fermenting bins and all the ingredients for my next two brews. My last brew was right before new year and since then I've just been willing it to finish fermenting so I can free up my fermenter for the next one. Solution: buy another fermenter!

Hurry up, damn you!

I'll be making the other bin into a dedicated hot liquor tank (HLT). This should make brew days a bit simpler, not having to run wort into a spare bin and then transferring it to the boiler. I also quite fancy trying first wort hops in a brew soon, so with the extra HLT I'll be able to run the wort directly onto the hops in the boiler, while sparging from the HLT.

At Christmas I got a load of brewing books and reading them just makes me want to get my brew on. With the two fermenters I'll be able to try out recipes twice a fast! So the first one is going to be a belgian tripel, based on Jamil's recipe from Brewing Classic Styles. Sounds like a good introduction to brewing a strong belgian beer, before I try any step-mash jiggery pokery. It also has sugar addition, which should be interesting to try.

The brew after that is going to be a re-brew of my first beer, with a couple of changes. I'll be using Crystal 60(ebc) instead of Crystal 120(ebc) to make it a bit lighter in colour. It should also remove the bit of liquorice flavour in batch #1. I'm also going to mash it at a slightly lower temperature, 1 or 2 degrees, to help it attenuate better. Batch #1 has stacks of body, so I think it will cope with thinning out a bit, and the lower temp should produce less complex sugars for the yeast to break down. I essentially want to see what difference the changes make, to help me understand the ingredients and process a bit more. But also to check that my first brew wasn't just a fluke!
Related Posts Plugin for WordPress, Blogger...